It is time for another Mo's Digital Pencil challenge. This week
Lydia is challenging everyone to use three punches on our creations.
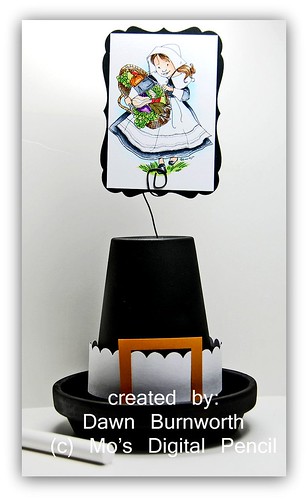
I wanted to do something for Thanksgiving. Those here in the
U.S. will celebrate next week. I used Charity from Mo's Digital
Pencil to create a place setting for my table on Thanksgiving day. I
have a quick tutorial on how you can make your own pilgrim hat.
All you need is a styrofoam ball, a clay flower pot and some
chalkboard paint or black spray paint. I chose the chalkboard
because I am going to write names on the hat itself for
place settings.
Spray paint the flower pot with the paint.. Do it in a well ventilated area and
allow to dry. I used several thin coats.
Next take your wire cutters or old scissors and bend your wire in a shape that
will hold your picture of photo. I used about 6 inches of wire.
I placed my styrofoam ball inside the pot and stick my wire through the
hole in the bottom. Push down the wire until it is secure inside the styrofoam
ball.
I then colored up my Charity. Used Spellbinders die, 2 square punches
and a Martha Stewart border punch to decorate the hat.
Come join the fun over at Mo's this week. She has some really great new images
out too.. Check out her blog HERE to see what's new..
 i
i


Wow! What a great tutorial Dawn. This would be perfect as a place card. Super fun and gorgeous!
ReplyDeleteOh my goodness....how clever are you Dawn. This is absolutely the cutest.
ReplyDeleteWOOOWEEE Dawn this is soooo super CUTE!!! What a FUN idea and this is sooo creative and fabulous!!! Thanks for the tutorial, AWESOME GF!!!!
ReplyDeleteWow Wow Wow..What a fantastic tutorial Dawn! You are sooooo creative! I just love how you did the hat and that image is so beautifully coloured! Thank-you for sharing such a wonderful tutorial!
ReplyDeleteAwesome idea, Dawn! That would make such a cute place card holder or center piece. As always your coloring is aaaa-mazing ;D
ReplyDeleteAdorable!! What a great pilgrim hat :)
ReplyDeletewow.....what a fab place setting decoration....so creative and well done...cute
ReplyDeleteSo clever and awesome, Dawn!! Thanks for showing us how you did that!
ReplyDeleteTotally cute, Dawn :)
ReplyDeleteWow Dawn, do you think to come to live in Europe, then we can craft together hehehe :) I really love your amazing craft work and this project is FAB!
ReplyDeleteLove this Dawn. Genius and oh so cool! Love the coloring and you, of course. hugsxo
ReplyDeleteDawn, what a wonderful creation. So special to use for your Holiday dinner. You always have so many wonderful ideas, so inspirational.
ReplyDeleteoh how fun! love your gorgeous little creation Dawn!
ReplyDeletehugs & blessings!
What a pretty image! And the place mark is so creative! So cute!
ReplyDeleteHow creative and darling Dawn! Fab place setting and excellent tutorial. Gorgeous design and coloring!
ReplyDeletehugs,
Chris
Oh, how darling! What a cute table decoration. Love that chalkboard stuff. Clever!
ReplyDeleteWhat a clever idea! Your table will be quite festive w/this beauty on it!
ReplyDeleteOh girl...you are sooo clever!! I love this fun idea and your image is just darling!! :) Thanks for the tut girl!!HUGS
ReplyDeleteWhat a great idea, I love it! Cool how it's made!
ReplyDeleteThis is sooooo clever and ever so effective. Fabulous! Warmest wishes, Lesley
ReplyDeleteThat is so cute!!!!
ReplyDeleteDawn you are so creative - I love this! Heading off to Michaels right now to whip up my own on this incredibly clever idea! I'm just always in awe of your work and now on the eve of Thanksgiving, I want to let you know how much I appreciate you and your talent and what you share with us bloggers day in and day out! Happy Thanksgiving!
ReplyDeleteHugs,
Sharon